Fullstack app [Part 1]: React app
This is Part 1 of my Fullstack app series. If you haven’t read the previous part, where I outline what we’ll do with the project, please make sure to check it out before this one!
In this post, we’ll make a simple bookmark app. Users will be able to save a URL of a webpage they like, and view it later through this app! You’ll learn how to set up a postgres database, hook it up to express API server, which the react app will communicate through Axios client.
It’ll look like this at the end.
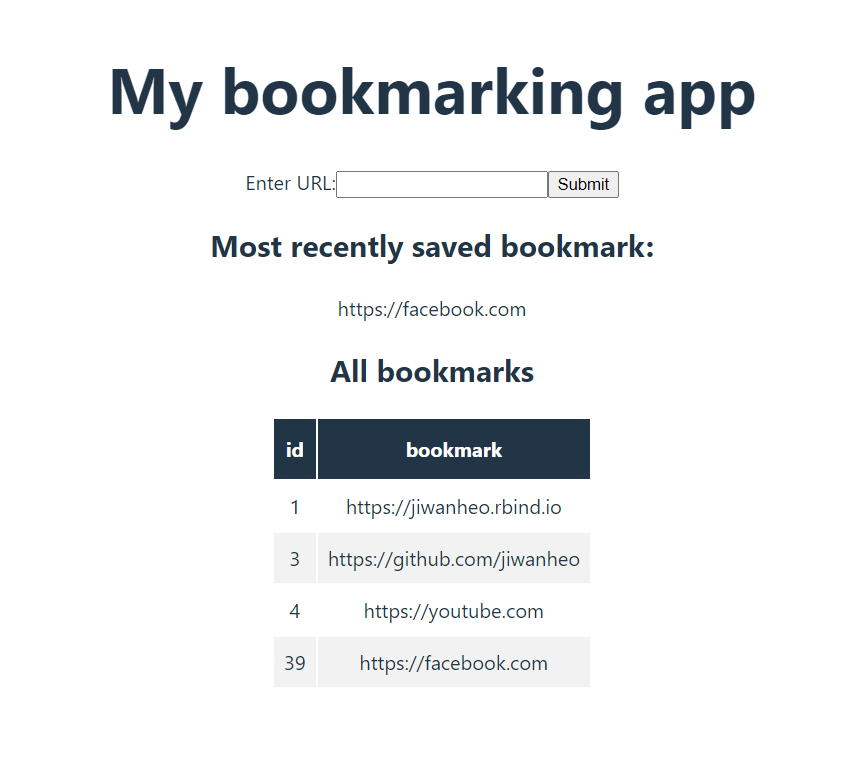
- A form to enter and save URL
- A text UI to see the most recent bookmark
- A table UI for seeing all the bookmarks
In API language, this is 1 POST request, and 2 GET requests that we’ll have to implement - one for seeing the latest bookmark, and another to query all bookmarks.
We’ll follow this order of things to do:
- Set up Vite project
- Set up Postgres database
- Set up Express API
- Make React App
- Connect React with Express through Axios
Where we’ll do the last two steps together.
Set up Vite
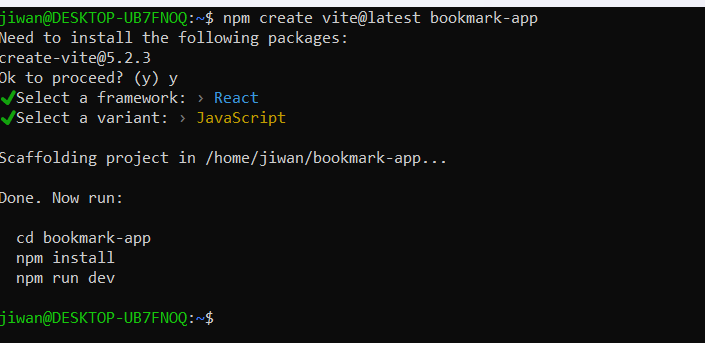
Let’s use Vite as our development server, and start a project called “bookmark-app”. Run
npm create vite@latest bookmark-app
It’s going to ask to install package and select a few options. I’m not going to do anything fancy and go react/javascript.
Vite follows ES6, as opposed to Common JS, which means
we can’t use require to import stuff, instead, we’ll have to use import.
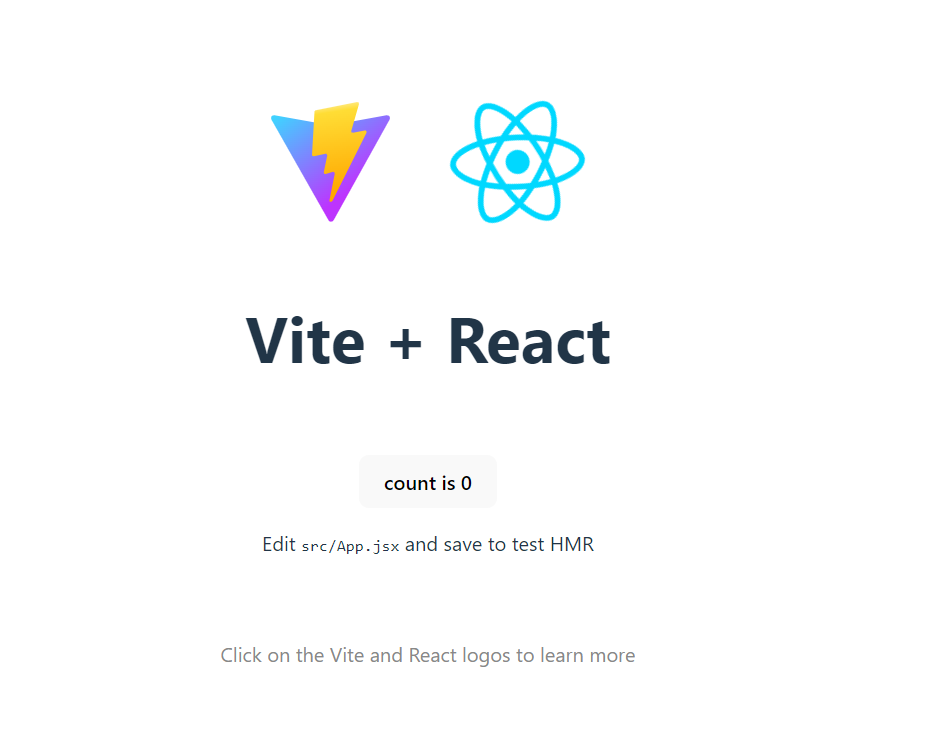
I’ll run the code suggested in the terminal. If you see this screen, you did it correctly!
Now from the WSL terminal, you should already be cd’d into the project.
You can run code . to open VS code.
Folder structure
Before we dive into coding, we’re going to do a little folder structuring to follow the Model-View-Controller (MVC) architecture pattern. This allows us to separate our logics nicely so we don’t step on each others' toes.
-
Model is responsible for the database piece. We’ll create our database object here, that the rest of the app can use.
-
View is responsible for presenting data to the user. This is the React app + Axios logic. We’ll go a step further, and separate out the Axios logic into its separate thing called “store”.
-
Controller is responsible for receiving requests from view, and processing them. This is where we write our Express API routing logic.
To start, we’ll separate out the backend and front end. On the project root
folder, create two folders called “backend” & “frontend”. Then move the public
and src folders there. Because we moved the main.jsx file that Vite uses as
entry point, we’ll need to update line 11 of index.html at the root folder to
point to the new location.

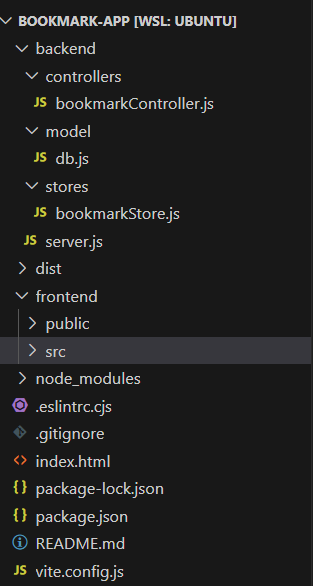
Now, in the backend folder, create the following folders/files
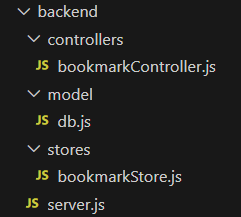
The three folders and its files correspond to the MVC structure above, and the
server.js file is where we’ll instantiate the Express API.
By now, your folder structure should look like this
Ok that’s it! Let’s get to coding!
Set up Postgres database
First and foremost, we’ll create our database to store our bookmarks.
I followed the documentation and ran the code they have there on the WSL terminal.
sudo sh -c 'echo "deb https://apt.postgresql.org/pub/repos/apt $(lsb_release -cs)-pgdg main" > /etc/apt/sources.list.d/pgdg.list'

wget --quiet -O - https://www.postgresql.org/media/keys/ACCC4CF8.asc | sudo apt-key add -

sudo apt-get update

sudo apt-get -y install postgresql
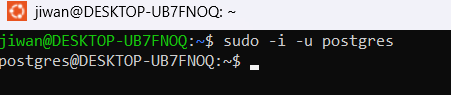
If you’re able to run sudo -i -u postgres to log in as postgres user, you’ve
installed it correctly.
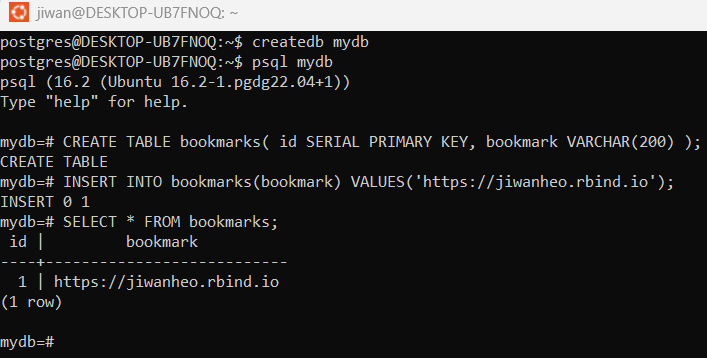
Now, let’s create a database called mydb, and within it, a table called
bookmarks. It will have just 2 columns, auto-incrementing “ID”, and “bookmark”.
We’ll fill it with one row of data.
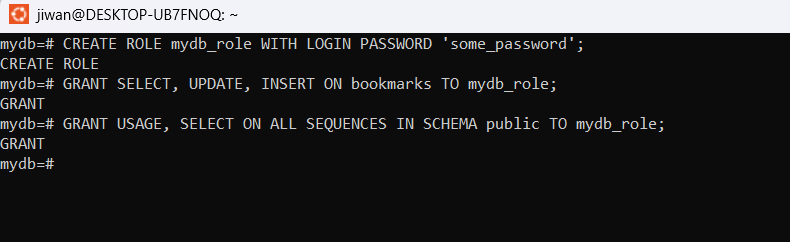
I’ll create a role for this db and grant access, so that we’re not doing
everything as the master user. Run the following codes while you’re in mydb.
This can be a little confusing!
CREATE ROLE mydb_role WITH LOGIN PASSWORD 'some_password';
As the root user, we’re going to create a role called “mydb_role”, which is basically a user who is not the root user
GRANT SELECT, UPDATE, INSERT ON bookmarks TO mydb_role;
We’re granting a table-specific privileges to perform SELECT, UPDATE, INSERT operations to the “mydb_role” role
GRANT USAGE, SELECT ON ALL SEQUENCES IN SCHEMA public TO mydb_role;
Schema is a collection of tables, views, sequences, and others. Postgres automatically creates a schema called
publicfor every new database. If we don’t specify a schema name when creating objects, postgres puts it in thepublicschema. SEQUENCES are used to populate incrementing (serial) IDs. To use this feature, we need to grant USAGE privilege on SEQUENCES, where USAGE allows access to objects contained in it.
Make sure you’re in the mydb database before you run these
(the terminal indicates mydb=#). If not, you can check it out with \c mydb.
Now back out of the psql shell, by running \q. We’re essentially logging out
as postgres role. Now, let’s log in as mydb_role role by running
psql -h localhost -d mydb -U mydb_role
Which means you’ll connect to the localhost server host, mydb database, as mydb_role user
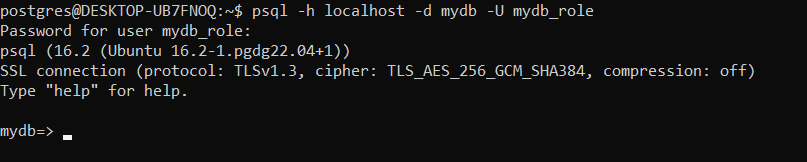
Finally, let’s check if the mydb_role can read/write to the bookmarks db.
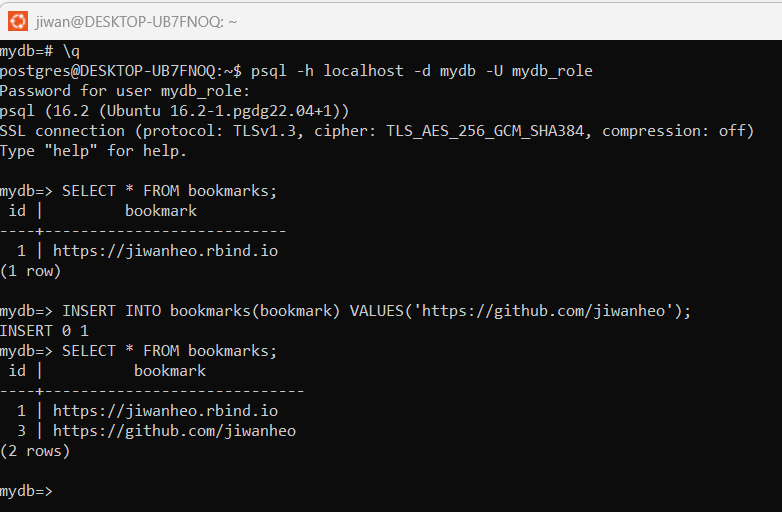
Looks good to me! Now, we’ll set up a script so the rest of the Node app can access it.
Install pg, a PostgreSQL client for Node.js.
npm install pg
Open “model/db.js”, and paste in this code. This imports the Pool class, which allows multi-user access to the db. Then, we create an instance of it with our login creds. (This should be done with environment variables, please don’t hard code in real life applications!)
import postgresql from "pg";
const { Pool } = postgresql;

export default (callback = null) => {
  const pool = new Pool({
    user: "mydb_role",
    password: "some_password",
    host: "localhost",
    port: 5432,
    database: "mydb",
  });
}
That’s it for the DB! Up next is the Express API server.
Set up Express API
Now, let’s set up the Express API and hook it up to the postgres db we just made.
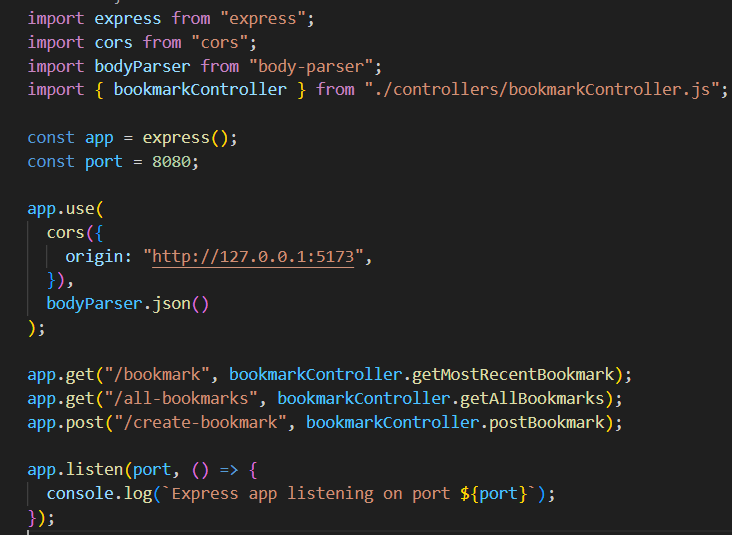
Open the “backend/server.js” file, and paste the following code.
import express from "express";
import cors from "cors";
import bodyParser from "body-parser";

const app = express();
const port = 8080;

app.use(
  cors({
    origin: "http://127.0.0.1:5173",
  }),
  bodyParser.json()
);

app.get("/bookmark", (req, res) => {
  res.send("hello");
});

app.listen(port, () => {
  console.log(`Express app listening on port ${port}`);
});
This is a pretty standard Express setup that runs on port 8080, and has 1 GET route ("/bookmark") that returns “hello”. bodyParser allows json-ifying the body content for things like POST requests, and a CORS policy that lets connection from the Vite app.
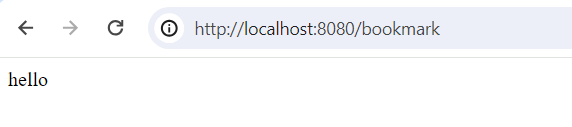
To see if it works, on command line, run node ./backend/server.js, and open
up chrome and head over to “http://localhost:8080/bookmark”. If you see this,
we’re good to go!
Quick note on CORS
CORS (Cross Origin Resource Sharing) policy blocks HTTP requests from origins that are not the same as the one that’s serving the requests. Our react app (Vite) runs on port 5173, and the express server runs on port 8080. Because they come from different ports, react app is blocked from making request to the express server. While it’s annoying, the benefit of CORS is that it allows your domain to allow reads from another trusted domain.
A common way to get around this policy is to use cors package and let the
express server know that any requests coming from port 5173 is a good one, and
should be allowed.
Install it with npm install cors, and the above code should work.
Routing
Now that the Express API is up and running, we’re going to set up some routes. Remember this?
In API language, this is 1 POST request, and 2 GET requests that we’ll have to implement - one for seeing the latest bookmark, and another to query all bookmarks.
Change your server.js to look like this
Instead of writing the “bookmark” routing logic function in here, we’re going to
write it in our controller file, and just import it here. Also, we’re going to
add in 2 more routes, all-bookmarks GET route, and create-bookmark POST route.
Now open up the controllers/bookmarkControllers.js and paste in this code
// This file contains API Routes
import { pool } from "../model/db.js";

async function getAllBookmarks(req, res) {
  const result = await pool.query("SELECT * FROM bookmarks;");
  res.send(result.rows);
}

async function getMostRecentBookmark(req, res) {
  const result = await pool.query(
    "SELECT * FROM bookmarks WHERE id=(SELECT max(id) FROM bookmarks)"
  );
  res.send(result.rows);
}

async function postBookmark(req, res) {
  // get the bookmark param off request
  const newBookmark = req.body.bookmark;
  const result = await pool.query(
    `INSERT INTO bookmarks(bookmark) VALUES('${newBookmark}');`
  );
  res.send(result);
}

export const bookmarkController = {
  getAllBookmarks: getAllBookmarks,
  getMostRecentBookmark: getMostRecentBookmark,
  postBookmark: postBookmark,
};
There’s a lot going on here. Let’s break it down.
- We first import the database connection pool, so we can make queries.
- We wrote three route functions, and inside each are the corresponding SQL queries.
- The first 2 get queries are pretty simple
- But to do the post request, we need to retrieve the bookmark passed in by
the user. This lives in the body of the
reqobject, and we’ll look for thebookmarkfield. (The user should be following this naming convention).
- Then finally, we’ll export the three routes as an object.
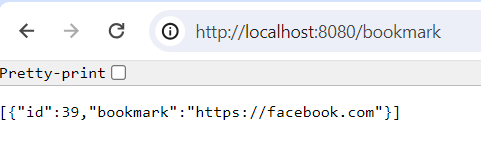
Now if you run node backend/server.js, and go to “http://localhost:8080/bookmark”,
you should see the bookmark. (My screenshot looks different b/c I added a few more
test cases)
Okidoki, now that we have the DB and the API to interact with it, let’s make the front end.
Make React App
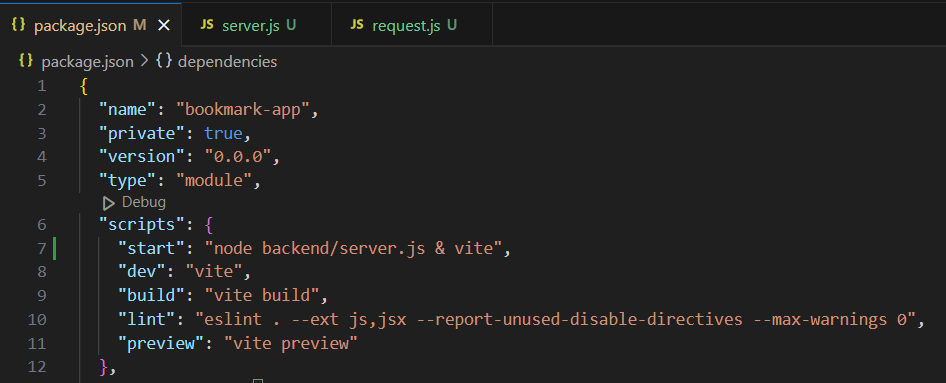
Before we get started on React coding, let’s add one package.json command. See that line 7? This starts up our API server, then starts up the Vite app. This is how we’ll make sure that API server is available when we need to use it from the app.
Now we’ll work on React + Axios. Although we separated them into two sections, you have to think about them at the same time as you build your app logic. This takes trial and error, you’ll find that changing one will affect the other.
Axios
Let’s leave it there, and first set up the Axios codes that React will use,
instead of interacting directly with the API server. Open up
stores/bookmarkStores.js and paste the following code.
import axios from "axios";

const fetchMostRecentBookmark = (setFunc) => {
  axios.get("http://localhost:8080/bookmark").then((res) => {
    const bookmarkValue = res.data.map((row) => row.bookmark);
    setFunc(bookmarkValue);
  });
};

const fetchAllBookmarks = (setFunc) => {
  axios.get("http://localhost:8080/all-bookmarks").then((res) => {
    const bookmarks = res.data;
    setFunc(bookmarks);
  });
};

// setFunc here sets `mostRecentBookmark`
const createBookmark = (bookmark, setFunc) => {
  axios
    .post("http://localhost:8080/create-bookmark", {
      bookmark: bookmark,
    })
    .then((res) => {
      setFunc(bookmark);
    });
};

export const bookmarkStore = {
  fetchMostRecentBookmark: fetchMostRecentBookmark,
  fetchAllBookmarks: fetchAllBookmarks,
  createBookmark: createBookmark,
};
fetchMostRecentBookmark makes a GET request to the “/bookmark” route, and
retrieves the bookmark string from the result (which will be in json). Then,
using its setFunc argument, which will be a useState setter function passed in
from React, we’ll set its value to the bookmark string, so that react can use it.
fetchAllBookmarks does something very similar with the “all-bookmarks” route,
but sets the whole JSON object into a state variable.
createBookmark is a POST request. It has two arguments, where bookmark is the
new bookmark that we want to create, which will be passed into the POST data field,
as a named object, and the similar setFunc argument like the GET requests.
Specifically, we’ll set it to be the most recent bookmark. (The most recently
submitted bookmark IS the most recent bookmark!)
React
Hopefully you’re still with me. Back to React. Let’s clear the content of src/App.jsx, and replace it with this code.
import { useEffect, useState } from "react";
import "./App.css";
import { bookmarkStore } from "../../backend/stores/bookmarkStore";

function App() {
  const [bookmark, setBookmark] = useState();
  const [mostRecentBookmark, setMostRecentBookmark] = useState();
  const [allBookmarks, setAllBookmarks] = useState();

  // Upon app load, get `mostRecentBookmark` & `allBookmarks` for the first time
  useEffect(() => {
  }, []);

  // Every user keystroke updates `bookmark`
  const handleTextChange = function (event) {
  };

  // Create new bookmark, by sending `createBookmark` POST request
  const handleFormSubmit = function (e) {
  };

  // When mostRecentBookmark is updated via the `createBookmark` POST request,
  // allBookmarks should be updated, by executing the `fetchAllBookmarks` GET request again
  useEffect(() => {
  }, [mostRecentBookmark]);

  return (
    <>
      <h1>My bookmarking app</h1>
      <form onSubmit={handleFormSubmit}>
        <label>
          Enter URL:
          <input type="text" name="url-text" onChange={handleTextChange} />
        </label>
        <input type="submit" value="Submit" />
      </form>

      <h2>Most recently saved bookmark:</h2>
      <span>{mostRecentBookmark}</span>

      <h2>All bookmarks</h2>
      <div id="all-bookmarks">
        <table>
        </table>
      </div>
    </>
  );
}

export default App;
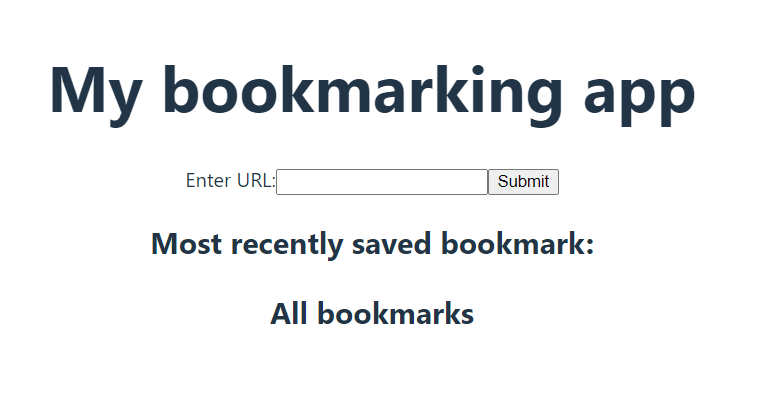
Now when you run npm run start, you should see a form to enter bookmark,
a section for displaying the most recent bookmark as text, and a section for
displaying all bookmarks as a table.
Let’s break down the code, and start to add to our app to make it all work, starting from the return value.
Implementation 1
Starting with the easiest one, this section displays the most recent bookmark as a span.
<h2>Most recently saved bookmark:</h2>
<span>{mostRecentBookmark}</span>
We’ll interact with the fetchMostRecentBookmark Axios code, and pass it the
setMostRecentBookmark setter function for it to update the value. There’s two
scenarios where we’ll update it; upon load, and whenever a new bookmark is created.
Upon load, we can use the blank [] useEffect to run this code once:
useEffect(() => {
  bookmarkStore.fetchMostRecentBookmark(setMostRecentBookmark);
}, []);
And upon new bookmark, we’ll handle it when we deal with form submission.
Implementation 2
Let’s change this table object
<h2>All bookmarks</h2>
<div id="all-bookmarks">
  <table>
  </table>
</div>
into this
<h2>All bookmarks</h2>
<div id="all-bookmarks">
  <table>
    <thead>
      <tr>
        <th>id</th>
        <th>bookmark</th>
      </tr>
    </thead>
    <tbody>
      {allBookmarks ? (
        allBookmarks.map((row, index) => (
          <tr key={index}>
            <td>{row.id}</td>
            <td>{row.bookmark}</td>
          </tr>
        ))
      ) : (
        <tr>
          <td colSpan="2"></td>
        </tr>
      )}
    </tbody>
  </table>
We know that the table has 2 columns, “id” & “bookmark”, so we’ll hard code the
thead DOM. Now for tbody, we’ll be referencing the allBookmarks state
variable. When it doesn’t exist (AKA, the app hasn’t yet received the result of the GET
request to fetchAllBookmarks), we’ll just fill in with a blank td. But when
it’s available, we’ll map over the JSON object, to make a tr of tds, yet
again, retrieving its id & bookmark field with a hard code.
Similar to mostRecentBookmark, allBookmarks is updated upon app load, and
when a new bookmark is created.
We’ll change the [] useEffect like so
useEffect(() => {
  bookmarkStore.fetchMostRecentBookmark(setMostRecentBookmark);
  bookmarkStore.fetchAllBookmarks(setAllBookmarks);
}, []);
And for the new bookmark, we’ll listen for change in mostRecentBookmark and
fire off fetchAllBookmarks once again.
useEffect(() => {
  bookmarkStore.fetchAllBookmarks(setAllBookmarks);
}, [mostRecentBookmark]);
Implementation 3
Finally, the form for the POST request.
<form onSubmit={handleFormSubmit}>
  <label>
    Enter URL:
    <input type="text" name="url-text" onChange={handleTextChange} />
  </label>
  <input type="submit" value="Submit" />
</form>
In the input text field, on every key-stroke, we’ll save whatever user is typing
to a state variable bookmark. This is done through onChange function like so
const handleTextChange = function (event) {
  setBookmark(event.target.value);
};
And upon form submission, we’ll send the bookmark value to
bookmarkStore.createBookmark method like so. Notice we’re passing in
setMostRecentBookmark setter function to update the most recent bookmark.
// Create new bookmark, by sending `createBookmark` POST request
const handleFormSubmit = function (e) {

  // Send the post request, and update `mostRecentBookmark`
  bookmarkStore.createBookmark(bookmark, setMostRecentBookmark);
};
There’s a bit of clunkiness with how react handles form submission, where it refreshes the whole page. So we’ll suppress that behaviour, and clear the form manually.
// Create new bookmark, by sending `createBookmark` POST request
const handleFormSubmit = function (e) {
  // React default behaviour is that on form submit, the entire page refreshes
  // we'll need to suppress it, so the request goes through
  e.preventDefault();

  // Send the post request, and update `mostRecentBookmark`
  bookmarkStore.createBookmark(bookmark, setMostRecentBookmark);

  // Clear form
  e.target.reset();
};
Finally, your app code should look like this
import { useEffect, useState } from "react";
import "./App.css";
import { bookmarkStore } from "../../backend/stores/bookmarkStore";

function App() {
  const [bookmark, setBookmark] = useState();
  const [mostRecentBookmark, setMostRecentBookmark] = useState();
  const [allBookmarks, setAllBookmarks] = useState();

  // Upon app load, get `mostRecentBookmark` & `allBookmarks` for the first time
  useEffect(() => {
    bookmarkStore.fetchMostRecentBookmark(setMostRecentBookmark);
    bookmarkStore.fetchAllBookmarks(setAllBookmarks);
  }, []);

  // Every user keystroke updates `bookmark`
  const handleTextChange = function (event) {
    setBookmark(event.target.value);
  };

  // Create new bookmark, by sending `createBookmark` POST request
  const handleFormSubmit = function (e) {
    // React default behaviour is that on form submit, the entire page refreshes
    // we'll need to suppress it, so the request goes through
    e.preventDefault();

    // Send the post request, and update `mostRecentBookmark`
    bookmarkStore.createBookmark(bookmark, setMostRecentBookmark);

    // Clear form
    e.target.reset();
  };

  // When mostRecentBookmark is updated via the `createBookmark` POST request,
  // allBookmarks should be updated, by executing the `fetchAllBookmarks` GET request again
  useEffect(() => {
    bookmarkStore.fetchAllBookmarks(setAllBookmarks);
  }, [mostRecentBookmark]);

  return (
    <>
      <h1>My bookmarking app</h1>
      <form onSubmit={handleFormSubmit}>
        <label>
          Enter URL:
          <input type="text" name="url-text" onChange={handleTextChange} />
        </label>
        <input type="submit" value="Submit" />
      </form>

      <h2>Most recently saved bookmark:</h2>
      <span>{mostRecentBookmark}</span>

      <h2>All bookmarks</h2>
      <div id="all-bookmarks">
        <table>
          <thead>
            <tr>
              <th>id</th>
              <th>bookmark</th>
            </tr>
          </thead>
          <tbody>
            {allBookmarks ? (
              allBookmarks.map((row, index) => (
                <tr key={index}>
                  <td>{row.id}</td>
                  <td>{row.bookmark}</td>
                </tr>
              ))
            ) : (
              <tr>
                <td colSpan="2"></td>
              </tr>
            )}
          </tbody>
        </table>
      </div>
    </>
  );
}

export default App;
As a last step, we’ll make the app a little nicer with a bit of css. Change the content of frontend/src/App.css to this:
#root {
  max-width: 1280px;
  margin: 0 auto;
  padding: 2rem;
  text-align: center;
}

#all-bookmarks {
  display: flex;
  justify-content: center;
}

#all-bookmarks td,
#all-bookmarks th {
  padding: 8px;
}

#all-bookmarks tr:nth-child(even) {
  background-color: #f2f2f2;
}

#all-bookmarks th {
  padding-top: 12px;
  padding-bottom: 12px;
  text-align: center;
  background-color: #213547;
  color: white;
}
Now you should be able to run npm run start to have the whole app functioning!
Conclusion
In this blog post, we looked at how to set up a full-stack Node.js app with Postgres db, Express API server, and a React frontend with Axios client, using Vite local development server.
Here’s the Github repo of the full thing.
In the next tutorial, we’ll be looking at deploying this app on Amazon EC2.